The Complete Guide to Alloy Steel Screws: How to Choose, Use, and Care for Them
Introduction
In building and engineering, even the smallest parts can cause big problems if they fail. A single screw that’s chosen wrong or installed poorly can make the difference between a structure that lasts and one that falls apart. This guide focuses on one of the most important types of fasteners: alloy steel screws. Unlike regular acier au carbone, alloy steel screws are specially made materials that have specific elements added to make them perform better under extreme stress. They aren’t just “stronger” screws – they’re solutions to tough engineering problems.
This article is designed to be the complete, practical guide for anyone working with these important parts. We will avoid confusing technical language and give you clear, useful advice. By the end, you will feel confident choosing, installing, and maintaining alloy steel screws correctly, making sure your projects are safe, reliable, and long-lasting.
Vous apprendrez :
- The basic properties of alloy steel and why it’s important.
- How to understand complex grades and specifications like a pro.
- A step-by-step method for choosing the perfect screw for any job.
- Professional best practices for installation and tightening.
- Proper storage and maintenance to make fasteners last longer and keep projects safe.
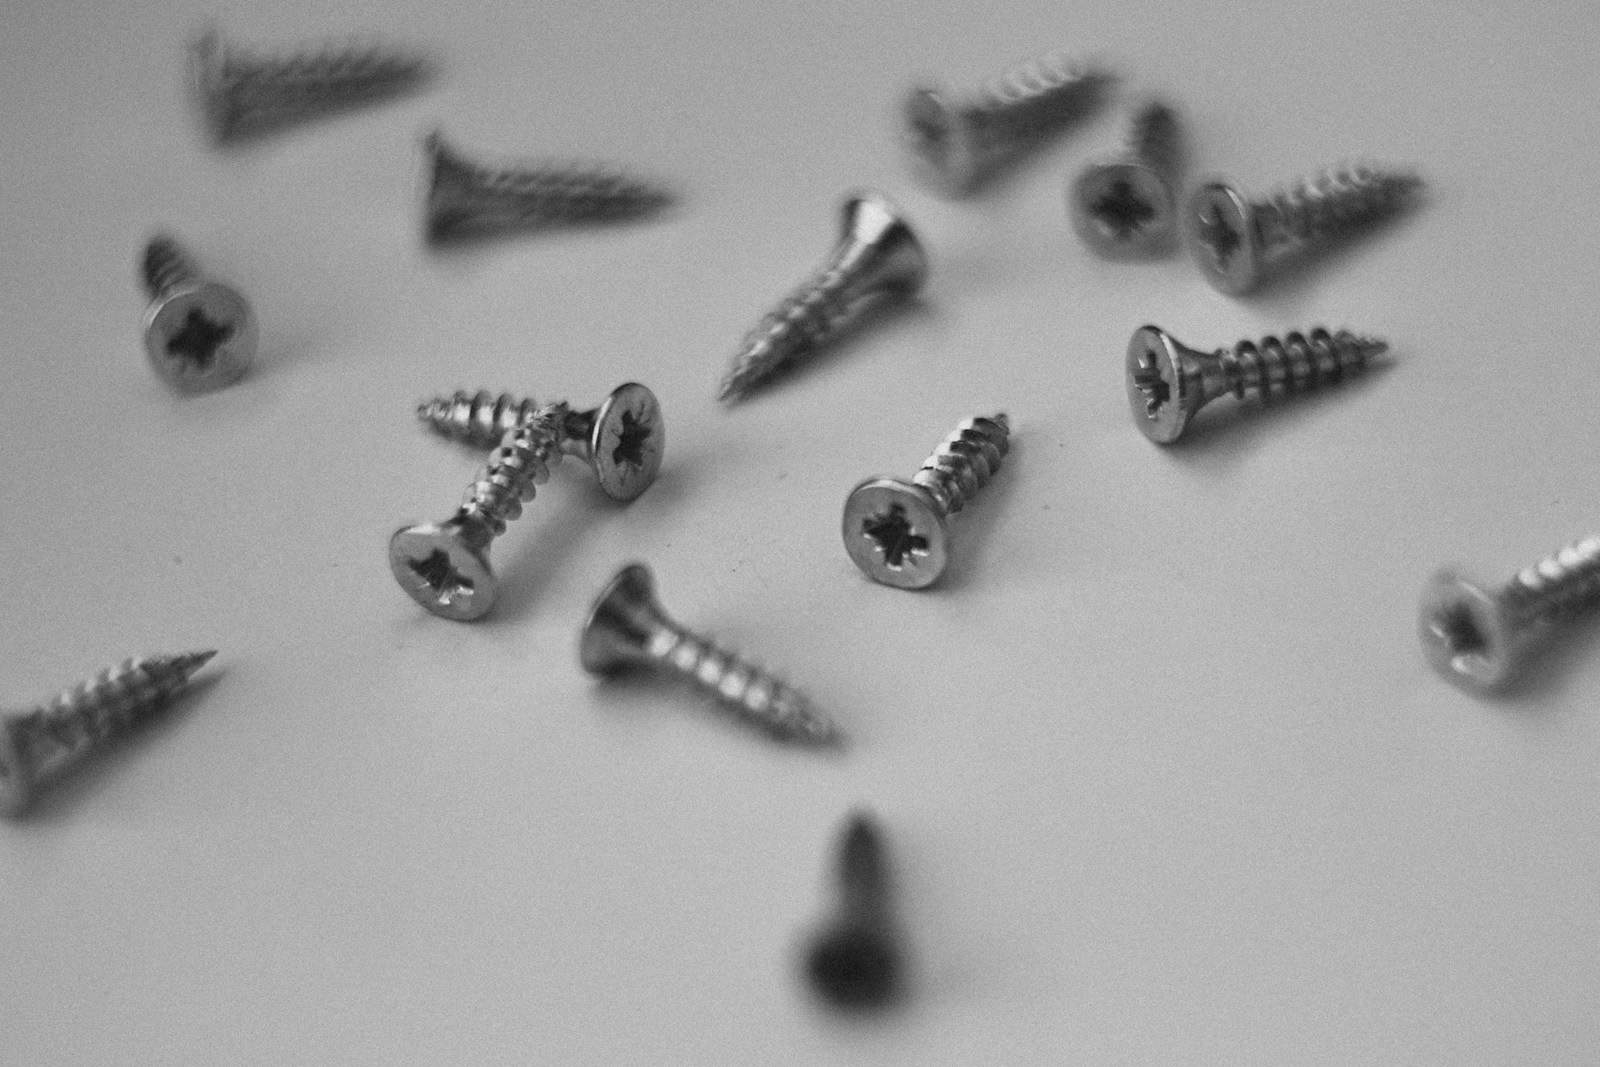
What Are Alloy Steel Screws?
To make good decisions, we must first understand the basics. Learning what alloy steel is, and more importantly, what makes it better for demanding jobs, is the first step toward using it correctly. This section explains the main concepts and terms that form the foundation of the entire selection and use process.
What “Alloy Steel” Means
At its core, all steel is a mixture of iron and carbon. However, when we talk about “alloy steel” for fasteners, we mean steels that have other elements purposely added to change their properties. Think of it like a cooking recipe: regular steel is the basic dough, but alloy steel has specific ingredients like chromium, molybdenum, nickel, or vanadium added in exact amounts. Each element gives unique characteristics, changing the final material. For example, chromium makes it harder and more resistant to rust, while molybdenum increases strength at high temperatures. This careful chemical engineering is what gives alloy steel screws their advanced abilities.
Avantages clés
The decision to use an alloy steel screw instead of a regular carbon steel one is driven by the need for better performance. The main advantages are clear and significant, directly affecting the safety and durability of an assembly.
- Superior Strength: This is the most recognized benefit. Alloy steels go through a heat treatment process called quenching and tempering, which rearranges their internal structure to dramatically increase both tensile strength (resistance to being pulled apart) and yield strength (resistance to permanent bending). High-quality alloy steel grades can show tensile strengths well over 150,000 PSI, far exceeding the ability of common low-carbon steel fasteners.
- Enhanced Toughness: Strength without toughness is brittleness. Toughness is a material’s ability to absorb energy and bend without breaking, which is critical for applications involving shock or impact loads. Alloying elements, combined with proper traitement thermique, give these screws the ability to withstand sudden forces that would snap a more brittle fastener.
- Improved Wear Resistance: In applications with moving parts or high-friction contact, wear resistance is extremely important. The hardness given by elements like chromium and carbon, locked in by traitement thermique, allows alloy steel screws to maintain their integrity and dimensions over millions of cycles, preventing joint loosening and early failure.
- Better Temperature Performance: Regular steel can become brittle at low temperatures or lose strength (a phenomenon known as creep) at high temperatures. Alloying elements like molybdenum and chromium specifically fight these effects. This makes certain alloy steel grades, such as ASTM A193 B7, the default choice for high-temperature, high-pressure environments like boilers, engines, and chemical reactors.
Understanding Grades and Specifications
The world of alloy steel screws is governed by a complex system of grades, standards, and markings. This can be intimidating, but understanding this language is essential for making sure you are using the correct, certified part. These markings are a guarantee of the fastener’s chemical makeup, processus de fabrication, and mechanical properties.
Understanding Grading Systems
The most direct way to identify an alloy steel screw’s ability is by the markings on its head. These markings are not decorative; they are a universal code. For inch-based (SAE) bolts, the system uses radial lines.
- SAE Grade 5: Identified by 3 radial lines on the head. This is a medium-strength quenched and tempered carbon-boron steel.
- SAE Grade 8: Identified by 6 radial lines on the head. This is a high-strength quenched and tempered alloy steel, offering a significant step up in tensile strength and performance.
For metric screws, a numerical property class system is used, typically stamped on the head.
- Class 8.8: A medium-strength screw, functionally similar to SAE Grade 5.
- Class 10.9: A high-strength screw, often considered the metric equivalent to SAE Grade 8.
- Class 12.9: A very high-strength screw, typically used in the most demanding applications like automotive engine internals and high-performance machinery. The “12” indicates the nominal ultimate tensile strength (1200 MPa), and the “.9” indicates that the yield strength is 90% of the ultimate tensile strength.
Common Alloy Steel Grades
While countless grades exist, a few dominate industrial and commercial applications. The following table provides a comparative overview of the most common grades and classes you will encounter. Understanding their key differences is essential for proper selection.
| Année d'études / Classe | Nominal Tensile Strength (PSI / MPa) | Common Alloying Elements | Caractéristiques clés & Applications courantes |
| SAE Grade 5 | cURL Too many subrequests. | cURL Too many subrequests. | cURL Too many subrequests. |
| cURL Too many subrequests. | cURL Too many subrequests. | cURL Too many subrequests. | cURL Too many subrequests. |
| cURL Too many subrequests. | cURL Too many subrequests. | cURL Too many subrequests. | cURL Too many subrequests. |
| cURL Too many subrequests. | cURL Too many subrequests. | cURL Too many subrequests. | cURL Too many subrequests. |
| cURL Too many subrequests. | cURL Too many subrequests. | cURL Too many subrequests. | cURL Too many subrequests. |
| cURL Too many subrequests. | cURL Too many subrequests. | cURL Too many subrequests. | cURL Too many subrequests. |
cURL Too many subrequests.
cURL Too many subrequests.
- cURL Too many subrequests.
- cURL Too many subrequests.
- cURL Too many subrequests.
- cURL Too many subrequests.
- cURL Too many subrequests.
cURL Too many subrequests.
cURL Too many subrequests.
cURL Too many subrequests.
cURL Too many subrequests.
- cURL Too many subrequests.
- cURL Too many subrequests.
- cURL Too many subrequests.
- cURL Too many subrequests.
- cURL Too many subrequests.
- cURL Too many subrequests. l'eau saléecURL Too many subrequests.
- cURL Too many subrequests.
- cURL Too many subrequests.
- What are the mating materials?
- The materials being joined are critical. Fastening a soft material like aluminum requires different considerations (like using a flange head or washer to distribute load) than fastening two steel plates.
- Also consider galvanic corrosion. When two different metals are in contact in the presence of an electrolyte (like moisture), one can corrode preferentially. A galvanic series chart can help guide compatible material and coating choices.
- Are there regulatory requirements?
- Does the project fall under a specific code or standard (e.g., building codes, ASME for pressure vessels, DOT for vehicles)? These regulations will often dictate the minimum grade and specification of fasteners required, removing any guesswork.
Step 2: Use the Decision Matrix
Once you have answered the questions in Step 1, this matrix serves as a powerful tool to guide your selection. Find your primary demand factor in the left column and follow the row to the right to see the recommended starting point.
| Primary Factor | Low Demand | Medium Demand | High Demand / Critical |
| Load (Strength) | Standard Carbon Steel (for reference) | Grade 5 / Class 8.8 | Grade 8 / Class 10.9 or 12.9 |
| Vibration / Dynamic Load | Use lock washer/threadlocker | Grade 5 with prevailing torque nut | Grade 8 / 10.9 with high-quality locking hardware |
| Température | Ambient temps only | cURL Too many subrequests. (for high temps) | Specialist Nickel Alloys (e.g., Inconel) |
| Corrosion | Dry, indoor use (Plain/Black Oxide) | Outdoor/Damp (Zinc or Phosphate) | Chemical/Marine (Hot-Dip Galvanized, or consider Acier inoxydable) |
How to use the matrix: Imagine you are fastening a critical suspension component on a piece of heavy equipment. The load is high and dynamic (vibration). The environment is outdoors with exposure to mud and water.
- Load (Strength): High demand -> Grade 8 / Class 10.9.
- Vibration: High demand -> Grade 8 with quality locking hardware.
- Corrosion: Outdoor/Damp -> Zinc or Phosphate coating.
Your selection is therefore a SAE Grade 8 screw with a robust zinc or phosphate coating, used in conjunction with a certified locking nut or washer.
Step 3: Finalize the Details
With the grade and coating determined, the final step is to select the physical features that best suit the installation and function.
- Head Style: The most common are Hex (for external wrenches/sockets) and Socket Head Cap (for internal hex keys/Allen wrenches). Socket heads are ideal for tight spaces where a wrench cannot fit.
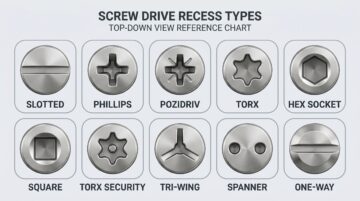
- Drive Type: For smaller screws, this could be Phillips, but for high-strength applications, internal drives like Torx or hex socket are superior as they allow for higher torque application without “camming out” and stripping the drive.
- Thread Pitch: Coarse threads (UNC) are more common, install faster, and are more tolerant of slight thread damage. Fine threads (UNF) offer slightly higher tensile strength due to a larger stress area and are more resistant to loosening from vibration.
Proper Use and Installation
Selecting the perfect alloy steel screw is only half the battle. A Grade 8 screw improperly installed will perform worse than a Grade 5 screw installed correctly. The installation process, specifically the application of torque, is what unlocks the fastener’s engineered potential.
The Importance of Torque
cURL Too many subrequests.
cURL Too many subrequests.
cURL Too many subrequests.
- cURL Too many subrequests.
- cURL Too many subrequests.
- cURL Too many subrequests.
- cURL Too many subrequests.
- cURL Too many subrequests.
cURL Too many subrequests.
cURL Too many subrequests.
- cURL Too many subrequests.
- cURL Too many subrequests.
- cURL Too many subrequests. cURL Too many subrequests.cURL Too many subrequests.
- cURL Too many subrequests.
cURL Too many subrequests.
cURL Too many subrequests.
cURL Too many subrequests.
cURL Too many subrequests.
- cURL Too many subrequests.
- cURL Too many subrequests.
- cURL Too many subrequests.
cURL Too many subrequests.
cURL Too many subrequests.
| cURL Too many subrequests. | cURL Too many subrequests. | Raison d'être | Fréquence |
| cURL Too many subrequests. | cURL Too many subrequests. | cURL Too many subrequests. | cURL Too many subrequests. |
| cURL Too many subrequests. | cURL Too many subrequests. | cURL Too many subrequests. | cURL Too many subrequests. |
| cURL Too many subrequests. | cURL Too many subrequests. | cURL Too many subrequests. | cURL Too many subrequests. |
| cURL Too many subrequests. | cURL Too many subrequests. | cURL Too many subrequests. | cURL Too many subrequests. |
cURL Too many subrequests.
Knowing when a screw is no longer fit for service is a critical safety judgment. Never re-use a fastener that shows any of the following signs:
- Visible Corrosion: Surface rust on a plain finish screw may be acceptable, but any sign of pitting (small craters in the surface) or significant red rust on a coated screw indicates the substrate is compromised.
- Deformed Threads: Any threads that are flattened, stripped, or galled (a form of wear caused by adhesion between sliding surfaces) will not allow for proper torque and engagement.
- Stretching or “Necking”: If you can see a visible reduction in the screw’s diameter, particularly below the head or in the thread-free shank area, it has been stretched past its yield point and must be discarded.
- Damaged Head: A rounded-off hex head or stripped internal drive makes it impossible to apply the correct torque and may make future removal impossible.
- Known History: If a screw has been subjected to a significant overload event, extreme heat (like from a fire), or if it is a TTY bolt, it should be retired regardless of its visual appearance.
Conclusion: Key Takeaways
Mastering the use of alloy steel screws is a hallmark of quality craftsmanship and sound engineering. It moves beyond simply joining parts and into the realm of creating secure, reliable, and durable assemblies designed to withstand specific forces and environments. The journey from understanding the material to executing a perfect installation is one of precision and knowledge. By learning the concepts in this guide, you can ensure your work stands the test of time and stress.
Remember these critical takeaways to guide your success:
- Selection is a process. Always analyze the load, environment, and regulatory requirements before choosing a screw. Use a systematic approach, not a guess.
- Grades and coatings matter. Match the screw’s grade to the application’s strength demand and the coating to the environmental challenge. Markings are a guarantee of performance.
- Installation is everything. The correct clamping force, achieved through precise torque, is what makes a joint safe and reliable. Use the right tools and the right techniques, every time.
- ASTM International – Standards for Materials & Testing https://www.astm.org/
- SAE International – Aerospace & Automotive Standards https://www.sae.org/
- ASME - Société américaine des ingénieurs en mécanique https://www.asme.org/
- Institut des fixations industrielles (IFI) https://www.indfast.org/
- NIST - Institut national des normes et de la technologie https://www.nist.gov/
- ISO - Organisation internationale de normalisation https://www.iso.org/
- ANSI - American National Standards Institute (Institut national américain de normalisation) https://www.ansi.org/
- ASM International - Société d'information sur les matériaux https://www.asminternational.org/
- Boîte à outils d'ingénierie – Ressources techniques https://www.engineeringtoolbox.com/
- Science et ingénierie des matériaux - ScienceDirect https://www.sciencedirect.com/topics/materials-science
Produits associés
Solutions et groupe
- Solutions de quincaillerie standard et sur mesure
- Aperçu des solutions
- Fixations pour voies ferrées à grande vitesse — Voir tous les articles
Articles associés
- Amortissement des vibrations et réduction du bruit : La science de la création du silence
- Guide ultime : Fabrication de vis de précision – Des matériaux aux tests de performance
- Au-delà de la valeur R : La vérité cachée sur la performance de l'isolation dans les bâtiments
- Guide ultime de la production de pinces à ressort : Matériaux, étapes et contrôle de la qualité
- Test d'isolation avancé : 3 courants clés pour une meilleure analyse des équipements
- Guide ultime : Pièces en fonte – Propriétés, conception et secrets de fabrication
- Guide ultime du processus de fabrication des vis d'assemblage : L'excellence en matière de fabrication révélée
- Guide ultime : Processus de sertissage expliqué – De la science à la réussite