Confirmat screws are stepped European-style fasteners engineered specifically for edge-to-face joining of particleboard, MDF, and melamine panels — the backbone of modern flat-pack and custom-built furniture assembly.
If you’ve ever assembled a kitchen cabinet, a flat-pack wardrobe, or a custom bookshelf and wondered how professionals create joints that last decades without glue or wooden dowels, the answer is almost certainly confirmat screws. These specialized fasteners look like ordinary screws but work on an entirely different mechanical principle — one that’s been refined by European furniture manufacturers since the 1970s.
In this guide we cover everything from how the confirmat design exploits stepped drilling to create a mechanical shoulder-lock, to which specific sizes work with which panel thicknesses, to the precise steps that separate a perfect joint from a stripped hole. Whether you’re a production cabinet shop optimizing throughput or a DIY builder tackling your first melamine wardrobe, confirmat screws are the one fastener category worth understanding in depth.
What Are Confirmat Screws?
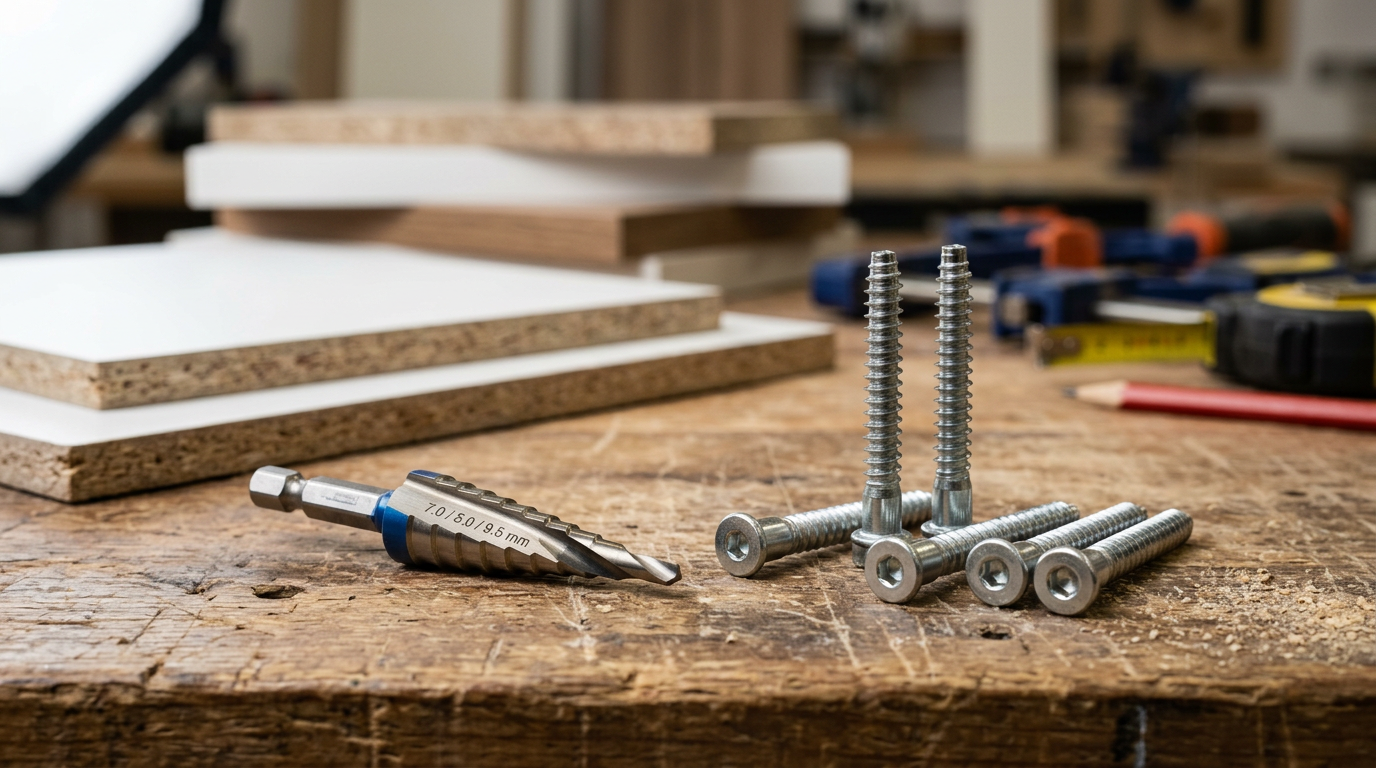
Confirmat screws are the standard solution for joining panels of engineered wood edge-to-face. They feature an oversized flat hex head, a smooth cylindrical shank beneath it (called the shoulder), and a coarsely threaded lower section that bites into the substrate panel.
The Stepped Geometry That Makes Them Work
A confirmat screw has three distinct zones along its shaft: the large flat head, a smooth cylindrical shank (the shoulder), and a coarsely threaded tip. This three-zone geometry directly mirrors the special drill bit used to install them — a confirmat step bit that cuts three diameters in one plunge: a clearance bore for the shank, a pilot for the thread, and a countersink recess for the head.
When you drive a confirmat screw, the shoulder acts as a precision spacer. It cannot travel further down once the head seats flush, which means you achieve consistent, repeatable clamp force every time — without stripping the substrate material or over-torquing the joint. According to Wikipedia’s technical entry on confirmat screws, the design was standardized by European KD (knock-down) furniture manufacturers specifically to allow repeated assembly and disassembly without joint degradation — a property no standard wood screw can match.
The result is a connection that delivers significantly higher pull-out resistance than a standard wood screw threading into the face of particleboard, and far greater racking resistance than a cam lock or plastic dowel used alone.
Confirmat vs. Standard Wood Screws vs. Dowels
Most DIYers default to a regular wood screw when joining boards because it’s familiar. In engineered wood, that’s a mistake. Here’s a direct comparison:
TABLE 1: Fastener Comparison for Engineered Wood Panel Joints
| Fastener Type | Pull-Out Strength (Particleboard) | Repeated Assembly Cycles | Accuracy Required | Visible Hardware |
|---|---|---|---|---|
| Confirmat screw | High (~1,200–1,500 N) | 5–10 cycles | Medium (step bit) | Hex head visible |
| Standard wood screw | Low–Medium (~400–700 N) | Poor (strips on 2nd use) | Low | Countersunk, hidden |
| Wooden dowel | Medium (~800–1,000 N) | Poor (swells/loosens) | High (alignment critical) | None |
| Cam lock (minifix) | Medium (~900–1,100 N) | Excellent (50+ cycles) | Very high (CNC preferred) | Visible fitting |
| Pocket screw | Medium (~700–1,000 N) | Fair (3–5 cycles) | Low | Hidden if plugged |
Confirmat screws occupy a clear sweet spot: stronger pull-out than standard wood screws, repeatable unlike dowels, and far cheaper than cam-lock systems that demand CNC-precision drilling. For edge-to-face joints in a shop environment where cabinets are assembled once or twice, they’re hard to beat on cost-per-joint.
Confirmat Screw Sizes and Specifications
Confirmat screws are not interchangeable with standard metric fasteners. They come in a specific set of diameters and lengths that correspond to matching confirmat step drill bits — get the size wrong and you either crack the panel on assembly or end up with a joint that pulls apart under load.
The head on virtually all confirmat screws is a 3/8-inch (10mm) hex drive, sometimes called a Euro hex. This means you need a 10mm hex bit or driver, not a Phillips or square drive — one more distinguishing feature that ensures furniture assemblers use the correct tool and the correct torque spec for every joint.
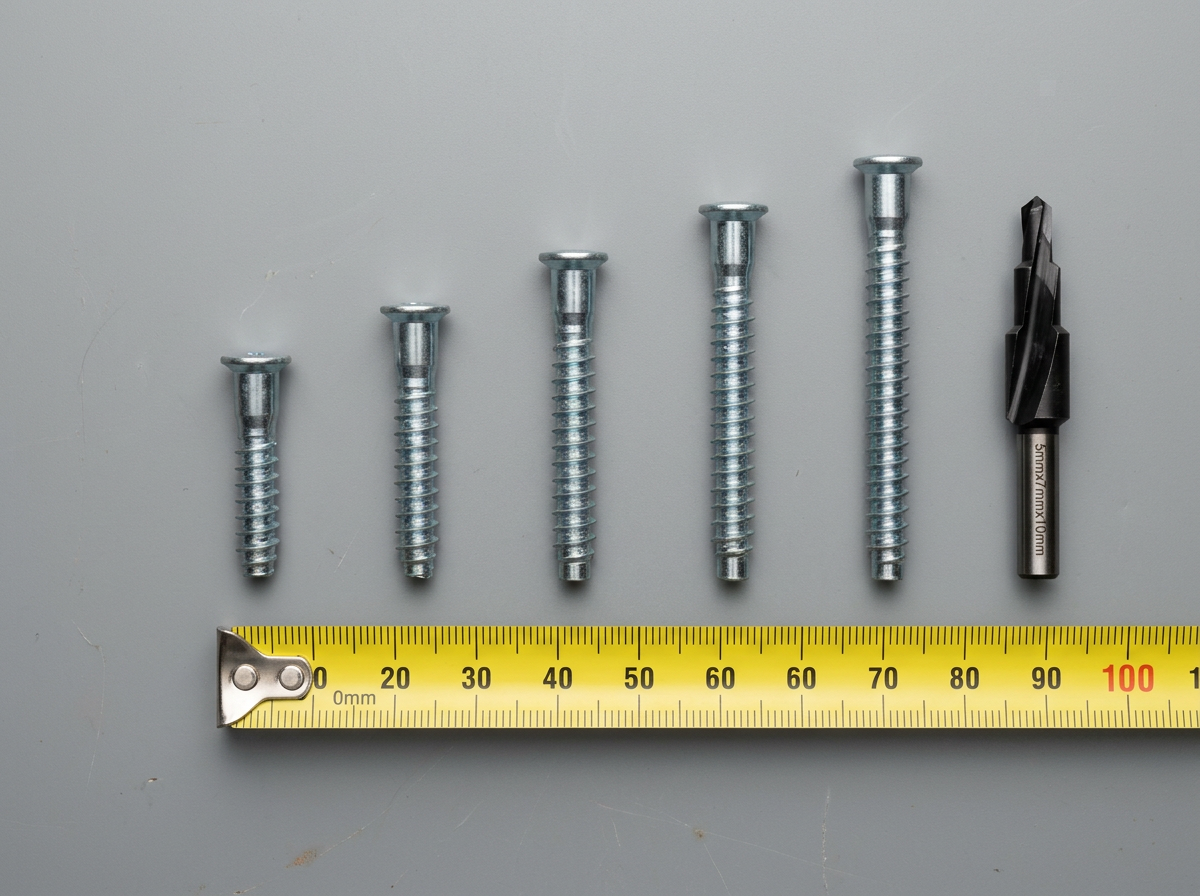
Standard Confirmat Screw Sizes
The most widely stocked confirmat screws in North America and Europe are:
TABLE 2: Confirmat Screw Sizes and Panel Compatibility
| Screw Size | Shank Diameter | Drill Bit Required | Recommended Panel Thickness | Common Application |
|---|---|---|---|---|
| 7 × 35mm | 7mm | 5mm pilot / 7mm shoulder | 15mm panels (tight spaces) | Compact cabinet carcasses |
| 7 × 50mm | 7mm | 5mm pilot / 7mm shoulder | 16mm particleboard | Standard cabinet side panels |
| 7 × 70mm | 7mm | 5mm pilot / 7mm shoulder | 18–19mm particleboard | Heavy shelving, wardrobes |
| 7 × 100mm | 7mm | 5mm pilot / 7mm shoulder | 25mm MDF or solid slab | Thick-panel furniture assembly |
| 6.3 × 40mm | 6.3mm | 4.5mm pilot / 6.3mm shoulder | 12–15mm MDF or HDF | Thin back panels, trim elements |
The most common size you’ll encounter in kitchen cabinet production is the 7 × 50mm confirmat screw. It works with 16mm melamine particleboard — the standard European sheet thickness — and provides full thread engagement in the substrate panel without risk of breakthrough. If you only stock one confirmat size, make it 7 × 50mm.
Matching Confirmat Drill Bits to Screw Size
A confirmat screw is only as good as the hole it goes into. Using a standard twist drill and a separate countersink gives you either a loose fit (shoulder wobbles in the bore) or a head that won’t seat flush — both of which destroy joint quality. You need a confirmat step drill bit sized to your screw diameter.
For 7mm confirmat screws, the bit cuts three diameters simultaneously:
– Clearance bore: 7mm (accepts the screw shoulder)
– Thread pilot: 5mm (guides and pre-stresses the threaded section)
– Head countersink: ~11mm (seats the hex head flush to the panel face)
The bit is driven in a single plunge to a stop collar preset to the correct depth — typically 30–32mm for 50mm screws. Set the collar before starting a production run and lock it. Changing depth mid-session is the fastest path to inconsistent joints and stripped pilots.
One production note: never run a split-tip confirmat bit through MDF at full drill speed. MDF is denser than particleboard and the heat from a fast plunge can fuse fibers around the shank, making the screw very difficult to extract later. Back the feed rate down when drilling MDF edges.
What Confirmat Screws Are Made Of
Most confirmat screws are carbon steel with a zinc-plated finish suitable for dry interior environments. For kitchen and bathroom cabinet assembly — where humidity swings are routine — stainless steel confirmat screws (typically 410 stainless or A2-grade) offer corrosion resistance without sacrificing tensile strength.
When buying confirmat screws in bulk, verify:
- Head type: flat hex (standard); some suppliers offer a cross-head variant for compatibility with speed-drive bits
- Thread pitch: coarse pitch (standard for particleboard/MDF); fine pitch for harder substrates like HDF back panels
- Finish: zinc for dry interior use; stainless or polymer-coated for humid environments
- Shank tolerance: premium confirmat screws hold ±0.05mm shank tolerances that reduce wobble in the clearance bore — important when assembling tight-tolerance cabinet face frames
What Materials Work With Confirmat Screws
Particleboard and Chipboard
Particleboard is the native habitat of the confirmat screw. The coarse threads compress the wood particles laterally, forming a dense plug of compressed material around the thread that provides excellent pull-out resistance — typically 1,200–1,500 N for a 7 × 50mm screw in 650 kg/m³ board. Compare that to the 400–700 N typical of a standard wood screw at the same depth, and you understand why production cabinet shops standardized on confirmat decades ago.
That said, particleboard edge density is lower than face density because the particles at cut edges are less compacted during manufacture. The confirmat’s wide threaded section compensates by engaging a larger fiber contact area per millimeter of depth than a narrower standard screw thread.
MDF (Medium-Density Fiberboard)
MDF responds well to confirmat screws, with pull-out strength that runs 10–15% higher than equivalent-density particleboard because MDF’s uniform fine-fiber matrix gives threads consistent bite with no void pockets. However, MDF has two specific failure modes to manage:
- Edge swelling in humidity: MDF absorbs moisture at cut edges more readily than at faces. If the cabinet will be exposed to humidity cycles, seal all cut edges before assembly with edge banding or a coat of PVA.
- Pilot hole splitting: MDF splits along the fiber plane if driven too fast or at excessive torque. Reduce clutch setting to 12 N·m maximum and always drill a clean pilot before driving.
There’s an active debate among cabinetmakers about confirmat screws versus pocket screws in MDF. Community discussions on the r/cabinetry subreddit reflect this tension: some shops prefer pocket screws in MDF edges for face-frame construction because the pocket geometry creates more face-to-face glue surface. That’s valid for face-frame boxes. For pure carcass assembly (top-to-side, back-to-side), confirmat screws remain the dominant fastener in professional production shops.
Melamine-Coated Panels
Melamine is a 0.3–0.5mm thermoset resin layer applied over particleboard or MDF. The confirmat clearance hole punches cleanly through melamine if drill speed is set correctly (~1,200–1,500 RPM for a clean, chip-free entry). The main cosmetic risk is tearout at the drill entry point on the visible face panel — back the work with a sacrificial board, or reverse-drill the entry side, if the face finish matters.
Where Confirmat Screws Don’t Work
- Solid hardwood: The confirmat thread pitch is optimized for engineered wood fiber. In solid maple or oak, tightly spaced threads pack grain fibers so densely that the screw often cams out before fully seating. Use traditional wood screws with a standard tapered pilot in solid lumber.
- Thin panels under 12mm: Thread engagement becomes too short for reliable pull-out in thin stock. Use smaller confirmat variants (6.3 × 35mm) or switch to pocket screws.
- Structural load-bearing joints: Confirmat screws are furniture-grade fasteners. For structural framing, joist hangers, or beam connections, use structural-rated fasteners specified for the load class.
Industry Applications of Confirmat Screws
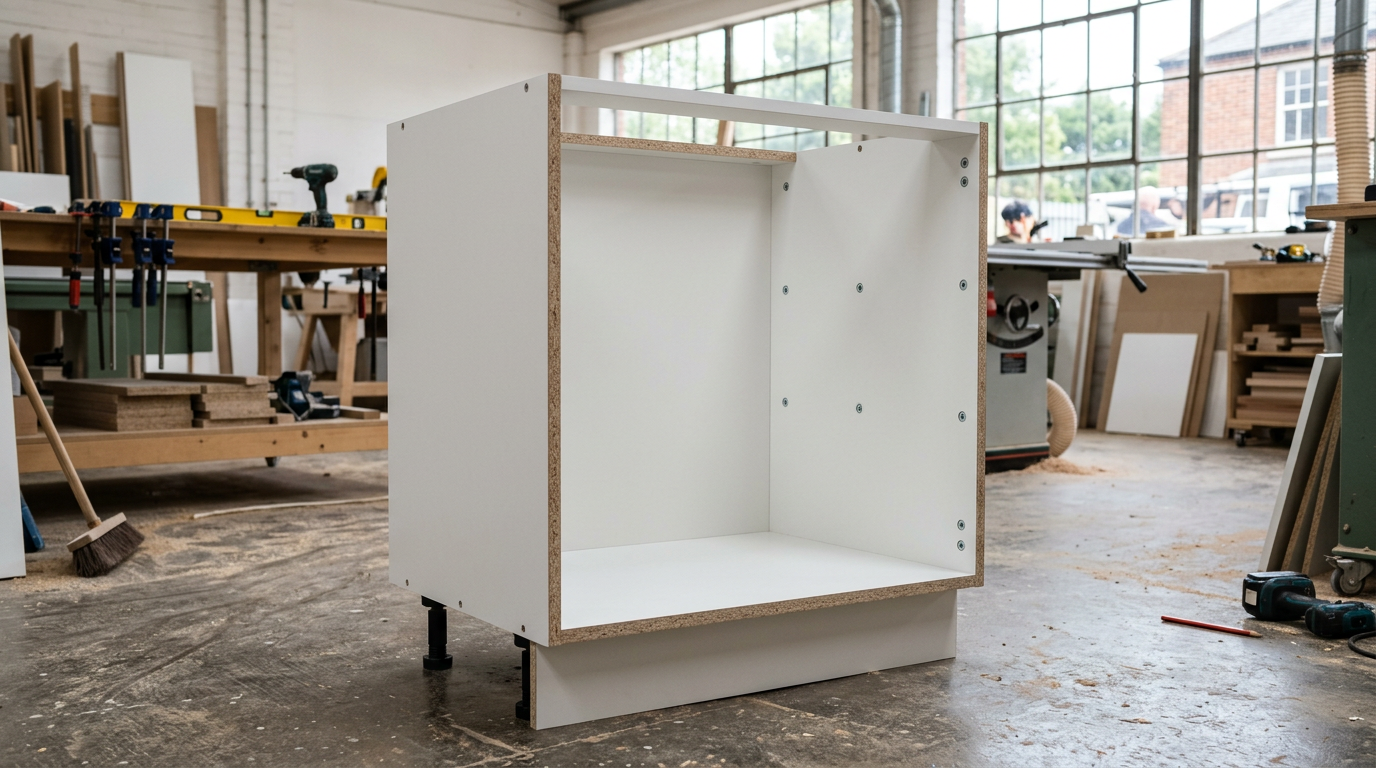
Kitchen Cabinet Manufacturing
Kitchen cabinetry is the single largest commercial application for confirmat screws worldwide. A typical 24-inch base cabinet carcass uses 8–12 confirmat screws to join its four sides, bottom panel, and hanging rail. The production flow in a typical cabinet shop runs:
- CNC router cuts all panels to size with confirmat clearance holes pre-bored on the face panels
- A step-drill fixture pre-bores all confirmat pilot holes in the substrate panel edges at fixed centers (usually 32mm or 37mm on-center from the panel edge)
- Assembly team drives confirmat screws with an impact driver set to a slip-clutch torque limiter (~14–16 N·m)
At scale, a two-person crew can assemble 40–50 base cabinet carcasses per day using confirmat screws. That throughput rate is simply not achievable with cam-lock or biscuit-joint systems.
RTA (Ready-to-Assemble) Furniture
Consumer RTA furniture brands pioneered cam-bolt and dowel systems for flat-pack assembly. But professional-grade RTA furniture — sold through cabinet supply dealers to contractors — heavily favors confirmat screws. The reason: a contractor-assembled piece needs to withstand field disassembly and repositioning. A properly drilled confirmat joint survives 5–8 assembly/disassembly cycles without measurable pull-out degradation. A cam-lock widens its bore slightly with every cycle.
European cabinetry hardware ecosystems (BLUM, Grass, Hettich) are built around 32mm hole-center spacing. Confirmat screw holes at 32mm centers share the same assembly jig as drawer slides, hinges, and adjustable shelf pins — one jig setup covers the full carcass.
Custom Woodworking and Shop Furniture
Beyond production cabinetry, confirmat screws are the go-to fastener for shop fixtures: workbench tops, router table inserts, tool storage cabinets, and precision jig bodies. The advantage here is cycle life: a shop jig needs to be disassembled for modification and reassembled to tight tolerances. Confirmat screws deliver 5+ clean cycles where standard wood screws lose their grip after the first two.
How to Install Confirmat Screws: Step-by-Step
Getting a confirmat joint right the first time takes five minutes to learn and permanently improves your furniture quality.
Tools Required
- Drill/driver with at least 400 in-lb torque (cordless drills work well; hammer mode OFF)
- Confirmat step drill bit (sized to match your screw diameter)
- Depth stop collar for the drill bit
- 10mm hex driver bit (Euro hex / 3/8″ hex)
- Torque-limiting clutch set to ~14–16 N·m for particleboard, 12 N·m for MDF
- Marking gauge for centering holes on the panel edge
Step 1 — Mark and Align the Panels
Clamp the two panels together in their final assembled position. Mark confirmat hole centers on the face panel at the recommended distances from corners: typically 50–70mm from each end for a 16mm panel, then every 150–200mm for longer spans.
For a 450mm-tall cabinet side, use three confirmat screws per joint: 70mm from top, 70mm from bottom, and one at center — this distributes clamp load evenly and prevents panel bow.
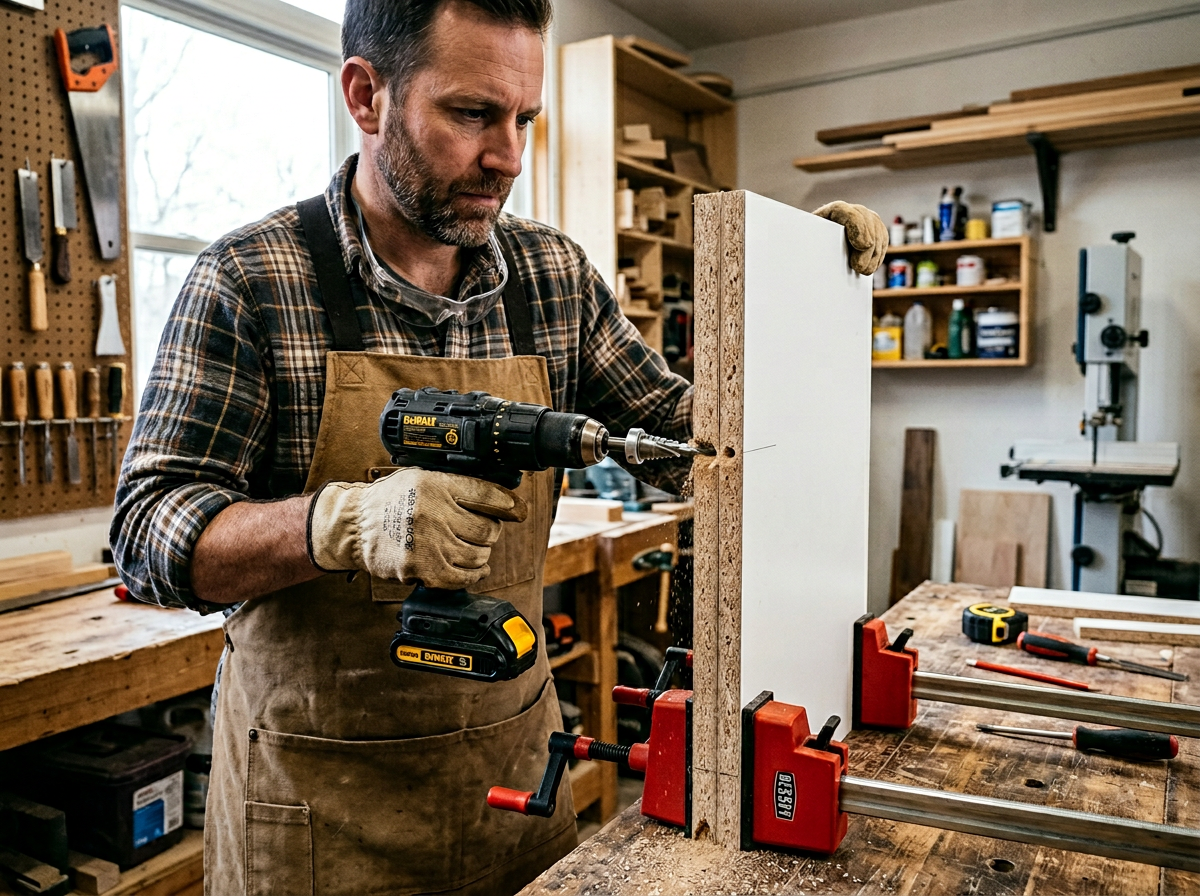
Step 2 — Drill the Face Panel Clearance Hole
With your confirmat step drill bit (depth collar set to shank length + 2mm clearance), plunge through the face panel only. The bit creates a stepped clearance hole — clearance bore for the shoulder, pilot for the thread zone, and countersink for the head — in one pass.
Check that the countersink depth leaves the head sitting flush or 0.3–0.5mm below surface. The head must not be proud — a proud head prevents the panels from mating correctly.
Step 3 — Transfer and Drill the Pilot Hole in the Edge
Without moving the panels, use a self-centering doweling jig or a dedicated confirmat edge-drilling guide to bore the pilot hole into the substrate panel’s edge. The pilot must be perpendicular to the edge face. Even 3–5° of off-angle drilling causes the screw to exit through the face of the substrate panel — splitting it and destroying the joint.
Pilot depth for a 7 × 50mm confirmat screw: approximately 22–25mm into the edge. This leaves ~18–20mm of full thread engagement.
Step 4 — Drive the Confirmat Screw
Insert the screw through the clearance hole and start it by hand for the first 3–4 turns to avoid cross-threading. Set your driver clutch, then drive until the head seats firmly and the clutch trips.
Do not continue driving after the clutch trips. The confirmat shoulder is now bottomed out — the joint is at maximum mechanical preload. Over-driving compresses and fractures the particle matrix around the thread bore. The first symptom is the screw spinning freely without further tightening — there’s no recovery from that in particleboard.
Step 5 — Check the Joint
Press the two panel faces together. There should be zero gap and zero flex. If the panels rock under hand pressure, the pilot hole is likely oversized (caused by a worn drill bit) or off-angle. In a production setting, any joint that moves under hand pressure fails QC — relocate the screw by at least 25mm or replace the panel.
TABLE 3: Installation Quick Reference by Material
| Material | Panel Thickness | Confirmat Size | Drill Bit | Torque Setting | Pilot Depth |
|---|---|---|---|---|---|
| Standard particleboard | 16mm | 7 × 50mm | 7mm confirmat bit | 14–16 N·m | 22mm |
| High-density particleboard | 18mm | 7 × 50mm | 7mm confirmat bit | 16–18 N·m | 22mm |
| Standard MDF | 18mm | 7 × 50mm | 7mm confirmat bit | 12–14 N·m | 22mm |
| Thin MDF / HDF | 12mm | 6.3 × 40mm | 6.3mm confirmat bit | 10–12 N·m | 18mm |
| Thick MDF slab | 25mm | 7 × 70mm | 7mm confirmat bit | 14–16 N·m | 38mm |
Common Mistakes When Using Confirmat Screws
Most confirmat joint failures trace back to one of five errors. Recognize these and you’ll hit a clean, tight joint every time.
Using the Wrong Drill Bit
The single most common mistake is substituting a standard twist drill and a separate countersink for the dedicated confirmat step bit. This gives you a clearance hole that’s either too small (shoulder binds and screw won’t fully seat) or too large (head can’t apply clamping force). Confirmat step bits cost $5–15 each — there’s no practical reason to skip them.
Misaligned Pilot Hole
A pilot drilled even 3–5° off-perpendicular to the edge will cause the screw to exit through the face of the substrate panel, splitting it visibly. Use a drill press for production work, or a dedicated edge-drilling jig for hand-tool shop work. This is particularly critical in MDF, where the material splits cleanly along the fiber plane with almost no warning.
Over-Torquing in Particleboard
Particleboard edge strength is finite. Setting the driver clutch too high compresses and fractures the particle matrix around the thread. The first symptom — screw spinning freely without tightening — has no fix. You must relocate the screw by at least 25mm or replace the panel. Match your torque setting to the material (see Table 3) and never override the clutch.
Wrong Screw Length for Panel Thickness
Rule of thumb: thread engagement = screw length − face panel thickness − shoulder length. For 7 × 50mm in a 16mm panel with a 12mm shoulder: engagement ≈ 22mm, which is adequate for 650 kg/m³ board. Go shorter and you reduce pull-out resistance; go longer and you risk the tip breaking through the back face of the substrate.
Using Confirmat Screws in Solid Wood
Solid hardwood’s grain structure is incompatible with confirmat thread pitch. The closely spaced threads pack grain fibers so tightly that the screw often cams out before fully seating — leaving a joint that looks assembled but has almost no clamp preload. For solid wood edge-to-face joints, use traditional wood screws with a tapered pilot drilled to the appropriate depth.
Future Trends: Where Confirmat Fasteners Are Headed in 2026+
Eco-Engineered Wood Panels Changing Specifications
The push toward low-VOC, recycled-content particleboard and MDF has shifted panel density profiles downward. Lighter eco-boards (580–610 kg/m³ versus standard 650 kg/m³) show 15–20% lower confirmat pull-out values — a measurable engineering gap for load-bearing carcass joints. In response, several confirmat screw manufacturers have introduced extra-wide-thread variants with a thread outer diameter of 7.5–8mm that compensates for lower host density by engaging more fiber volume per millimeter of depth.
By 2026–2027, expect more production cabinet shops to specify these oversize confirmat variants alongside low-emission certified board to meet structural specs without reverting to cam-lock hardware.
Hybrid CNC-Confirmat Integration
Traditional confirmat installation has always been a two-step manual process: CNC pre-drills clearance holes, and an assembler hand-drives the screws. High-volume European cabinet factories (Biesse and Homag CNC installations) now deploy combination drilling-and-insertion heads that drill the confirmat hole and partially seat the screw in a single CNC pass — the assembler only drives the final quarter-turn to clamp.
This hybrid workflow reduces per-joint assembly time from ~35 seconds to under 10 seconds. As North American production labor costs rise, expect this technology to migrate downstream to mid-volume cabinet shops by 2027. For fastener supply, the implication is rising demand for confirmat screws in collated tray or belt-fed formats compatible with semi-automated drivers.
Frequently Asked Questions About Confirmat Screws
Are confirmat screws good for MDF?
Yes — MDF holds confirmat screws well, with pull-out strength running 10–15% higher than equivalent-density particleboard. The caveats: use lower drill speed to prevent heat-fusing fibers, reduce driver torque to ~12 N·m, and seal cut MDF edges before assembly if the cabinet will see humidity cycles. In dry interior environments, confirmat screws perform reliably in MDF for both carcass and shelf joints.
What’s the difference between confirmat and wood screws?
The core difference is geometry. Confirmat screws have a stepped shank — smooth shoulder plus coarse-threaded tip — designed for edge-to-face panel joining with a matched step drill bit. Standard wood screws have a uniform tapered thread optimized for end-grain or face-grain solid wood, driven with a standard pilot. In particleboard and MDF, confirmat screws achieve 2–3× the pull-out resistance of a standard wood screw at equivalent screw diameter.
What drill bit do I need for confirmat screws?
You need a confirmat step drill bit (also called a KD bit or Euro assembly bit) sized to your screw diameter. For 7mm confirmat screws, the bit cuts three zones simultaneously: 7mm clearance bore for the shoulder, 5mm pilot for the thread, and an ~11mm countersink for the hex head. Available at most woodworking suppliers for $5–15; do not substitute a standard twist drill.
Can confirmat screws be used to attach cabinets to a wall?
No. Confirmat screws are designed exclusively for panel-to-panel connections in sheet goods. For wall attachment, use structural wood screws (#10 × 3-inch) through a nailer or hanging rail into studs, or the appropriate masonry anchor for concrete or brick walls. Confirmat screws lack the shear strength for wall-hanging applications.
Where can I buy confirmat screws?
Confirmat screws are stocked by woodworking suppliers (Rockler, Woodcraft, McFeely’s), industrial fastener distributors, and cabinet hardware dealers. Big-box stores (Home Depot, Lowe’s) carry limited sizes (7 × 50mm and 7 × 70mm are most common). For production quantities, distributor pricing delivers significantly lower per-unit cost than retail. Browse our confirmat screw inventory at productionscrews.com for bulk pricing and full size range.
How many times can I reassemble a confirmat joint?
A properly drilled confirmat joint in standard particleboard survives 5–8 disassembly/reassembly cycles before measurable pull-out degradation. Each cycle removes a small amount of the compressed particle matrix around the threads. After 8–10 cycles, relocate the screw by at least 25mm or replace the panel. In denser MDF, cycle life is typically slightly higher.
Do I need to countersink confirmat screw heads separately?
No — the confirmat step bit already creates the countersink as part of its stepped profile, sized and angled to match the confirmat hex head. If you drill with a standard bit and separate countersink, the angle may not match the confirmat head exactly, leaving the head proud or rocking in the bore. Use the matched confirmat bit for correct seating.
Are confirmat screw heads visible after assembly?
The hex head is visible on the panel face after assembly. In typical cabinet construction, confirmat screws face into closed interior corners and are not visible from the outside. Where the head would be visible, plastic cap covers (white, beige, and grey) are available that snap over the hex head and match standard melamine colors. In production cabinetry, visible interior confirmat heads are industry-standard — most customers never see the inside of a base cabinet carcass.
Conclusion
Confirmat screws have been the professional standard for engineered-wood furniture assembly for over 50 years because they get three things right simultaneously: higher pull-out strength than standard wood screws, better repeat-assembly tolerance than dowels, and far lower material cost than cam-lock systems — all in a fastener that installs in roughly 20 seconds per joint with a hex driver.
The formula for success is straightforward: use the correct confirmat step drill bit sized to your screw, set your driver clutch to the material-appropriate torque limit, and match screw length to panel thickness. Get those three variables right and the joints will outlast the panels themselves.
For production quantities of confirmat screws — including the full metric size range, stainless options for humid environments, and bulk tray pricing — explore the complete inventory at productionscrews.com.
Related Products
Solutions & Cluster
Related Articles
- Acme Threaded Rod: Complete Buyer’s Guide + Sizing Chart (2026)
- Through Bolts: Complete Guide to Types, Uses, and Installation
- Thread Pitch Explained: The Complete Guide to Screw Thread Measurement, Standards & Selection
- The Complete Guide to Security Screws: Types, Applications & Why They Matter
- Thru Bolt: Complete Guide to Types, Sizes, and Installation (2026)
- UNF Thread: Complete Guide to Unified National Fine Thread Specifications
- Locking Nuts: Complete Guide to Types, Selection, and Installation
- Bolt Nut Stainless Steel: Grades, Pairing, and Buying Guide