Nut Caging: Complete Guide to Cage Nuts, Types & Installation
A cage nut is a spring-steel-caged threaded insert that snaps into a square panel hole, giving you a captive, removable fastening point in sheet metal, server racks, and enclosures — no welding, no press-fit tooling, no permanent deformation of the panel.
You’ve been there. A rack-mount switch needs to go in, you drop in the screws — and they spin. Freely. The square holes in the rack rail are just holes. Nothing to thread into. That’s exactly the problem nut caging solves: a tiny spring-steel assembly snaps into the square hole in under two seconds, and suddenly you have a secure M6 or 10-32 thread exactly where you need it, removable if you ever need to reconfigure.
Nut caging is one of those fastener technologies that once you understand it, you see it everywhere: in every 19-inch server rack, inside automotive door panels, across telecom cable management assemblies, and increasingly in EV battery enclosures. This guide covers how cage nuts work mechanically, every major type and size, material and finish selection, step-by-step installation, and a direct comparison against the three alternatives engineers most commonly confuse with cage nuts.

What Is Nut Caging?
Nut caging is the practice of inserting and retaining a threaded nut inside a spring-steel cage so that the assembly — cage plus nut — can be clipped into a pre-cut square hole in a sheet metal panel or rack rail. The cage grips the panel edges elastically; the nut floats slightly or sits fixed, depending on type. The result is a reusable threaded attachment point that can be added, moved, or removed without any special tooling on the panel itself.
The term “nut caging” covers both the hardware (the cage nut product) and the process (snapping cage nuts into position before final assembly). In production environments, caging is done during sub-assembly — a technician runs down a rail or panel clipping cage nuts into every position that will later receive a screw. On the bench, a single cage nut goes in by hand or with a setter tool in a few seconds.
As Wikipedia’s entry on cage nuts explains, the cage nut’s key advantage over a plain hex nut is captivity: once installed, the nut cannot fall behind the panel, cannot be dropped into an enclosure during maintenance, and cannot rotate away from the screw path. That captive, retained behavior is exactly what makes nut caging indispensable in rack-mount and enclosure work.
The Mechanics — How Spring-Steel Caging Works
The cage itself is stamped from spring steel — typically 0.3–0.5 mm thick, heat-treated after forming to achieve the springback needed to grip panel edges. The manufacturing sequence matters: the nut (a standard hex nut, often zinc-plated) is placed into the cage blank before the tabs are formed closed. Once the cage is folded around the nut, the nut is captive for life.
When you push a cage nut into a square hole, the cage’s protruding tabs compress inward, pass through the hole, then spring back outward on the far side of the panel — gripping the panel between the front flange and the rear tabs. The grip force depends on panel thickness. Most standard cage nuts are designed for panels 0.8–2.0 mm thick; outside that range, the tabs either cannot compress far enough (too thick) or snap through without gripping (too thin).
The thread form inside the nut is standard — metric (M3 through M12) or inch-series (6-32, 10-32, 12-24, 1/4-20). Because the nut is a standard hex nut mechanically, it holds standard torque values for its grade. What changes is the retention force of the cage itself — typically 10–50 N pull-out resistance — which is sufficient for rack-mount loads but not for structural tension applications.
Cage Nut Terminology and Standards
A few terms get used interchangeably in catalogs and specs. Knowing the distinctions prevents wrong orders:
- Cage nut — the standard term; a separate nut captured inside a spring-steel cage
- Captive nut — broader category; includes cage nuts, press-in nuts, and weld nuts
- Clip nut — usually a U-shaped spring-steel clip that captures a hex nut; similar function, different form factor
- Rack nut — colloquial term for cage nuts used specifically in EIA-310 standard server racks
- Float nut — a floating-position cage nut; the nut can shift ±1–2 mm within the cage for misalignment correction
The EIA/TIA-310 standard governs 19-inch rack equipment mounting, including the square-hole pattern that standard cage nuts are designed to fit. Per this standard, the mounting hole is 9.5 × 9.5 mm (for standard rack rails), and the screw thread is 10-32 UNF or M6, depending on region. American racks typically use 10-32; European and international racks increasingly standardize on M6.
| Feature | Cage Nut | Weld Nut | PEM Press-In Nut | Rivet Nut |
|---|---|---|---|---|
| Installation method | Snap into square hole | Weld to panel | Press/hammer into round hole | Rivet gun into round hole |
| Removable? | ✅ Yes, reusable | ❌ Permanent | ❌ Permanent | ❌ Permanent |
| Panel access needed | Front only | Both sides | Front only | Front only |
| Panel deformation | None | Heat distortion risk | Slight swage | Slight expansion |
| Tooling required | None (or setter) | Welder | Press or hammer | Rivet gun |
| Reposition after install? | ✅ Easy | ❌ No | ❌ No | ❌ No |
Types of Cage Nuts
The three core types of cage nuts are fixed, floating, and locking — and choosing the wrong one is the single most common ordering mistake engineers make. Fixed cage nuts are fine when holes are precisely located. Floating types exist specifically for assemblies where hole patterns may shift ±1–2 mm between mating parts. Locking versions add prevailing-torque resistance for vibration environments.
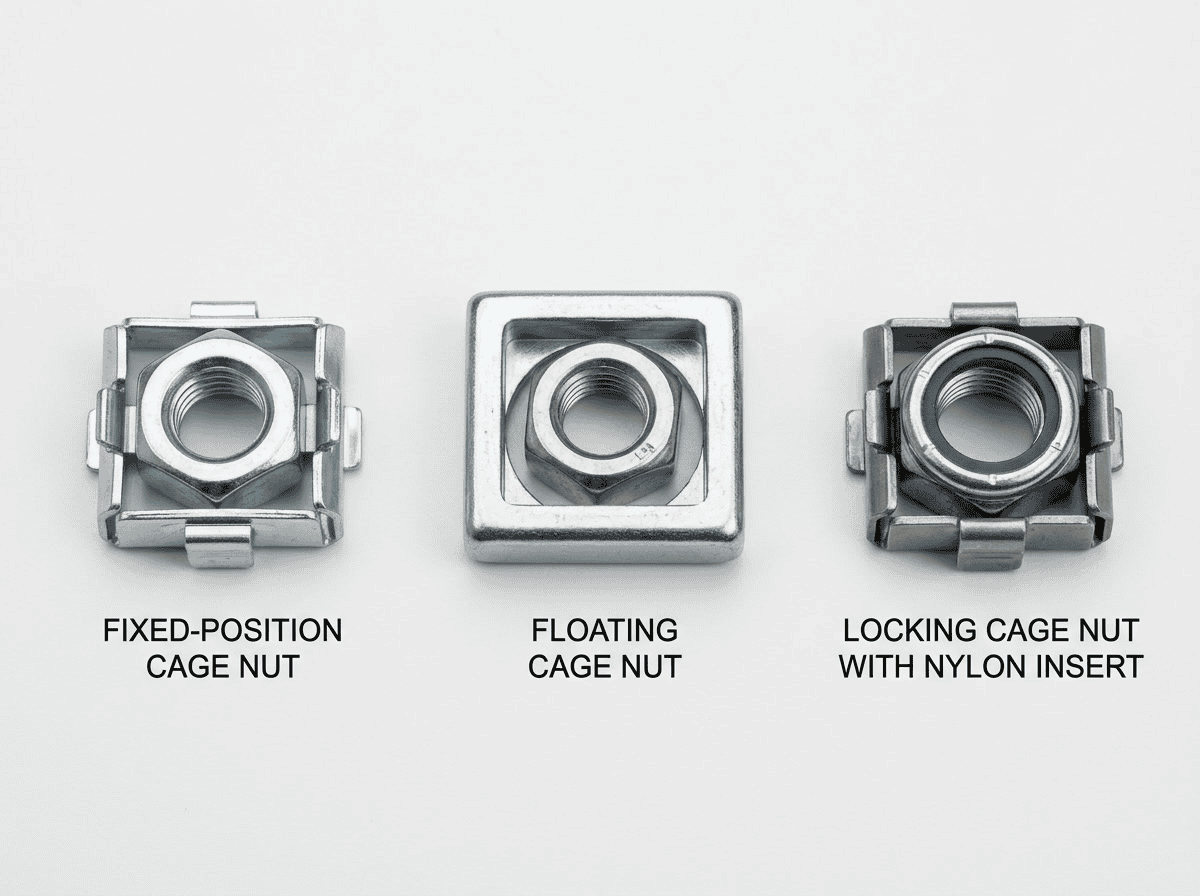
Standard Fixed-Position Cage Nuts
The most common cage nut. The nut sits centered in the cage with minimal float. Once snapped into the panel hole, it presents the thread at a fixed location. Best for:
- Server rack rails where EIA-310 hole patterns are tightly toleranced
- Enclosure panels machined or punched with precisely located holes
- High-volume production where consistent torque application is more important than alignment flexibility
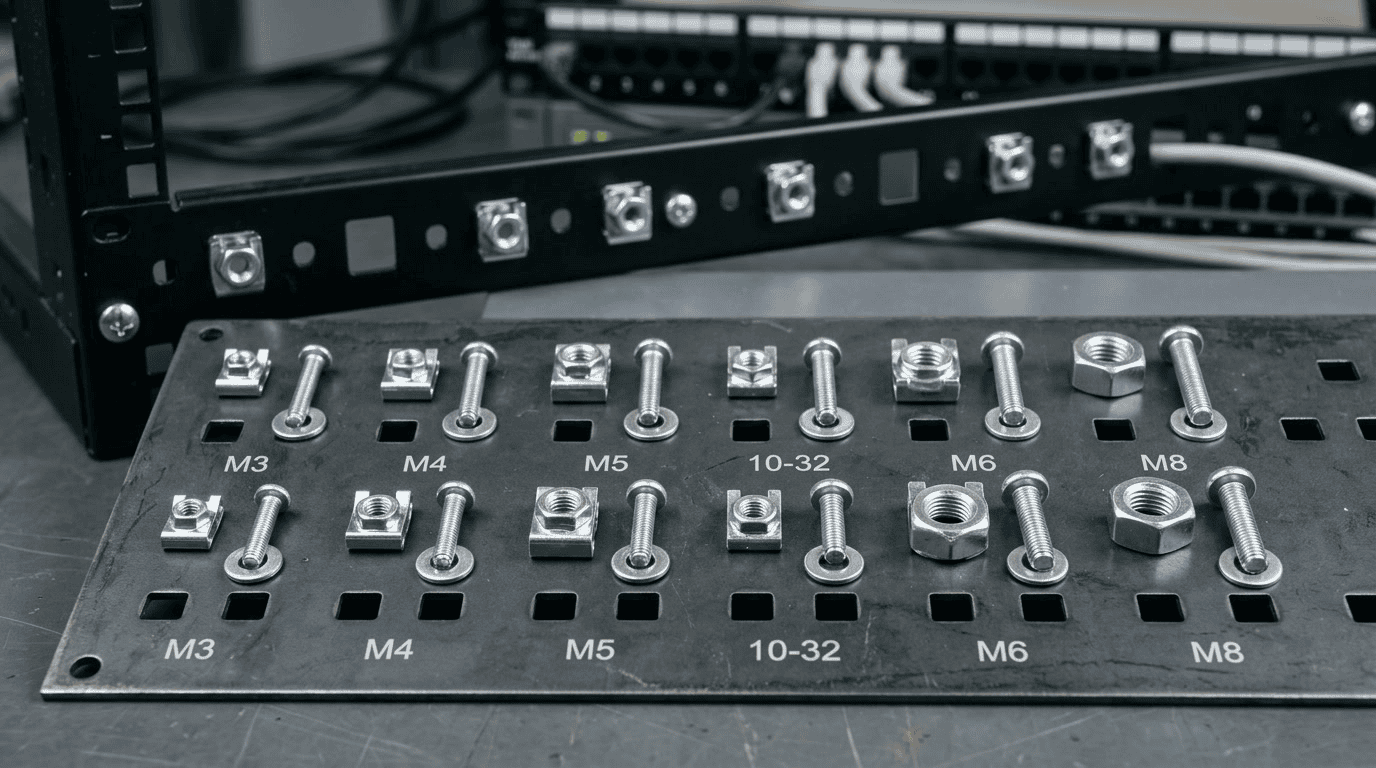
In practice we’ve found that standard cage nuts cover roughly 80% of rack and enclosure applications. Thread sizes M3, M4, M5, M6, M8, 6-32, 10-32, 12-24, and 1/4-20 are all widely available in this format. Cage material is almost universally carbon steel; plating varies (see materials section below).
One thing spec sheets rarely mention: the cage tab geometry affects how easy installation is, not just retention. Cages with a wider front flange are easier to align to the hole; cages with narrow tabs require more precise positioning before the snap-through. For high-repetition assembly work, that difference in ergonomics matters across hundreds of installations per shift.
Floating Cage Nuts — Self-Aligning for Misaligned Holes
Floating cage nuts allow the inner nut to move ±1–2 mm in X and Y directions within the cage. The nut is not rigidly centered — it’s loosely retained in a larger cage cavity. When the mating screw starts threading in, the nut self-centers on the screw axis, tolerating minor hole misalignment between the two panels being joined.
Use floating cage nuts when:
- Two pre-drilled panels must mate and their hole patterns may not align perfectly after painting, coating, or thermal expansion
- Welded assemblies where the secondary panel’s holes shifted during heat distortion
- MRO replacement scenarios where a new panel doesn’t exactly match the original hole layout
The downside of floating types: slightly more play in the installed assembly until the screw is fully torqued. In vibration environments, this can cause fretting. For those situations, the locking variant addresses both problems.
Locking / Prevailing-Torque Cage Nuts
Locking cage nuts add a deformed thread feature to the captive nut itself — often a nylon insert (similar to a nyloc nut) or a mechanically deformed thread profile. The prevailing torque resists loosening under vibration without requiring thread-locking adhesive.
These are the right choice for:
- Vehicle body panels and underbody components subject to road vibration
- Industrial machinery enclosures with motor-induced vibration
- Any assembly where periodic servicing means repeated screw removal — the locking feature survives several removal/reinstallation cycles before wearing out
Note: locking cage nuts cost roughly 2–3× the price of standard cage nuts and require slightly higher installation torque. For static rack environments, the cost and effort premium is usually unjustified.
| Thread Size | Square Hole Size | Panel Thickness Range | Typical Retention Force | Common Standard |
|---|---|---|---|---|
| M3 | 4.5 × 4.5 mm | 0.5 – 1.2 mm | 10–15 N | DIN EN 20898 |
| M4 | 6.0 × 6.0 mm | 0.8 – 1.5 mm | 15–20 N | DIN EN 20898 |
| M5 | 7.0 × 7.0 mm | 0.8 – 2.0 mm | 20–30 N | DIN EN 20898 |
| M6 | 9.5 × 9.5 mm | 1.0 – 2.0 mm | 25–40 N | EIA-310 / DIN |
| M8 | 11.5 × 11.5 mm | 1.2 – 2.5 mm | 30–50 N | DIN EN 20898 |
| 10-32 UNF | 9.5 × 9.5 mm | 1.0 – 2.0 mm | 25–40 N | EIA-310 (US) |
| 12-24 UNC | 9.5 × 9.5 mm | 1.0 – 2.0 mm | 25–40 N | Rack / enclosure |
| 1/4-20 UNC | 11.0 × 11.0 mm | 1.2 – 2.5 mm | 30–50 N | Heavy enclosure |
Materials, Finishes & Strength
For most indoor rack and enclosure applications, zinc-plated carbon steel cage nuts perform well and cost least. Stainless A2 is the right call for wet, coastal, or chemical environments. Black oxide suits low-glare enclosed assemblies where aesthetics matter.
The material question often gets treated as an afterthought — and that’s when corrosion or galvanic failure shows up two years into a product’s life. Let’s address it properly.
Carbon Steel with Zinc Plating
The industry default. The cage and nut are both low-carbon steel (typically AISI 1008–1020), case-hardened or spring-tempered for the cage. Zinc electroplating — typically 5–12 µm thick — provides barrier corrosion protection and meets RoHS requirements when trivalent chromate passivate is used.
Salt spray performance for standard zinc-plated cage nuts is typically 96–200 hours per ISO 9227. That sounds like a lot until you realize coastal or outdoor equipment sees equivalent corrosion exposure in months. For indoor, climate-controlled data centers and equipment cabinets, zinc-plated steel is perfectly adequate. That covers the vast majority of nut caging applications.
Stainless Steel A2-70
When humidity, salt air, acids, or cleaning agents are in play, switch to A2 (304-equivalent) stainless cage nuts. Stainless cage nuts cost 3–5× more than zinc-plated steel, but the salt spray resistance exceeds 500 hours and the corrosion resistance is essentially indefinite in most industrial environments.
Important nuance: galvanic compatibility. If you’re threading a stainless screw into a stainless cage nut mounted in a steel panel, the nut and screw are compatible. But if the rack rail is raw aluminum and you install carbon steel cage nuts, you get galvanic corrosion at the cage-to-rail interface. In that scenario, stainless or aluminum-compatible cage nuts are the correct specification.
Black Oxide for Low-Glare Enclosures
Black oxide cage nuts are carbon steel with a conversion coating — not a plating. The oxide layer is only 1–3 µm thick and provides minimal corrosion resistance on its own (typically applied with oil or wax for 24–48 hour salt spray protection). The primary reason to specify black oxide: aesthetics and light reflection reduction in camera housings, audio equipment, and precision instrument enclosures where reflections are problematic.
If black appearance is needed with real corrosion protection, specify black zinc-plated cage nuts instead — the zinc is still present but has a black chromate topcoat, giving you 96-hour salt spray performance with the low-glare finish.
Where Nut Caging Is Used — Industry Applications
Cage nuts are the dominant captive fastener in three specific environments: EIA-310 server racks, industrial electrical enclosures, and automotive/aerospace sheet metal where removability is required. Outside those three, alternative retention methods often win on cost or pull-out strength.
Server Racks and Data Centers
This is the home territory of nut caging. The EIA/TIA-310 standard for 19-inch rack equipment defines the square mounting hole (9.5 × 9.5 mm) and the 1U (1.75-inch) hole spacing pattern that cage nuts are designed for. Almost every server, switch, patch panel, and PDU that goes into a rack uses cage nut retention because:
- The rack rails have square holes — no threaded inserts — so cage nuts are required to get any threading
- Equipment gets racked, de-racked, and re-racked constantly through equipment lifecycles
- Nut caging allows technicians to pre-position cage nuts before sliding heavy equipment in, rather than fumbling screws into blind holes
In a typical data center row, a single 42U rack may use 96–168 cage nuts across two rails. Pre-staging those cage nuts (the “caging” step in rack preparation) is a standard part of rack build procedures at every major colocation and hyperscale operator.
Electrical Enclosures and Control Panels
Sheet metal enclosures for PLCs, motor drives, and panel boards use cage nuts for the same reasons: mounting positions change between panel layouts, enclosures are assembled from purchased sheet metal that arrives with square knockout holes, and the installer needs threading without back-panel access.
Standard cage nut sizes for electrical enclosures are M4, M5, and M6 metric or 10-32 and 1/4-20 inch-series, depending on whether the equipment follows IEC or NEMA/UL specifications. A key difference from rack applications: enclosure panels are often thicker (2.0–3.0 mm powder-coated steel), which means specifying cage nuts with a wider panel thickness range — or using heavy-duty enclosure cage nuts with longer cage tabs.
Automotive, EV Battery Packs & Aerospace Sheet Metal
Automotive body-in-white assemblies have used clip nuts and cage nuts for decades for trim panel attachment, where screws must be accessible from one side and removal for service is expected. As ARaymond’s technical documentation on industrial cage nut solutions shows, the self-aligning float version is particularly popular in automotive trim because painted and formed sheet metal panels routinely drift from nominal hole positions by 1–2 mm.
EV battery enclosure assembly is an emerging growth segment for cage nuts. Battery module mounting requires removable fastening (battery service access is a regulatory requirement in several jurisdictions), and the lightweight aluminum enclosures demand fastener systems that don’t permanently deform thin-gauge material. According to Grainger’s industrial fastener catalog, demand for M6 and M8 stainless cage nuts for EV-adjacent applications has grown significantly since 2023, reflecting the shift toward modular, serviceable battery designs.
Aerospace sheet metal applications use cage nuts primarily for access panels — inspection covers, avionics bay doors, and structural fairings where removability and lightweight are both requirements. In these applications, cage nuts are typically stainless or titanium, and the cage design is often custom-engineered for the specific panel thickness and pull-out force requirement.
How to Install Cage Nuts — Step-by-Step
Cage nut installation takes 5–15 seconds per nut when done correctly. The two most common failure modes are wrong-size holes (nut falls through or won’t snap in) and over-torquing the screw (strips the nut thread or deforms the cage). Here’s the process for both hand and tool installation.
Manual Finger-Press Method
For light-gauge panels (0.8–1.5 mm) and occasional installation without a setter tool:
- Verify hole size. The square hole must match the cage nut specification — typically 9.5 × 9.5 mm for M6/10-32, 7.0 × 7.0 mm for M5. Use a hole gauge or calipers; a hole that’s even 0.5 mm too large will cause the cage tabs to spring through without gripping.
- Orient the cage nut. The front flange (larger flat face) goes toward you; the spring tabs face the panel rear.
- Position and press. Align the cage tabs with the square hole. Apply steady thumb pressure until you feel (and often hear) the tabs snap through. The cage nut should now sit flush against the panel face with no rocking.
- Check retention. Try to pull the cage nut out by hand. It should resist with noticeable force. If it pulls out easily, either the hole is too large or the panel is out of the cage nut’s rated thickness range.
In practice we’ve found that manual installation is fine for 50 or fewer cage nuts per session. Beyond that, a setter tool saves significant thumb fatigue and reduces installation errors substantially.
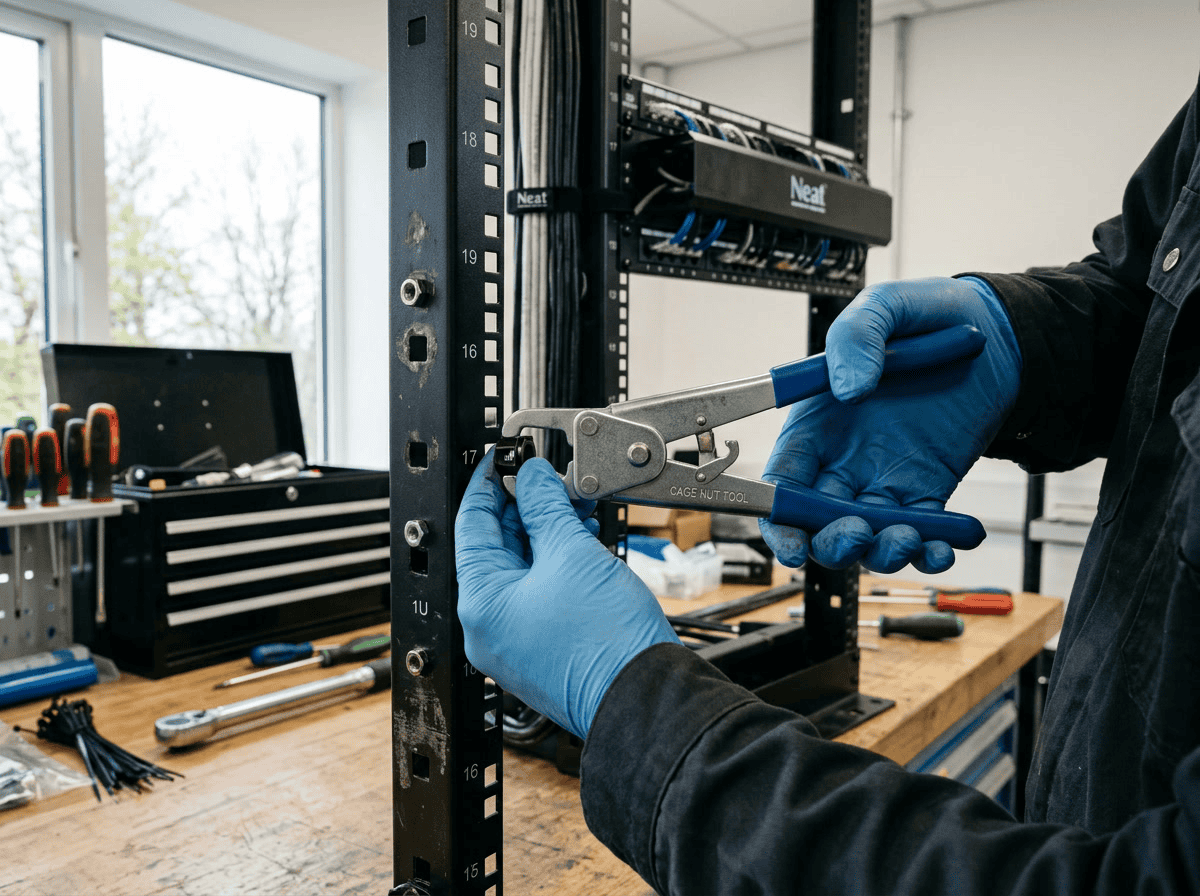
Using a Cage Nut Setter Tool
A cage nut setter (sometimes called a cage nut installation tool or cage nut remover/installer) is a forked or flanged tool that mechanically compresses the cage tabs through the panel hole without requiring direct finger contact. There are two main designs:
- Lever-type setter — a forked hook compresses the rear tabs while a forward lip pulls the nut through the hole; one-handed operation
- Pliers-type setter — squeezes the cage sides to compress tabs, then pushes; requires both hands but works well on thick panels
Pro tip: For rack installations, get the tool designed for your specific rack standard (EIA-310 vs. proprietary). Some rack vendors make cage nuts with slightly tighter tab geometry — the wrong setter tool can deform the cage without fully seating the nut.
Using a setter tool, installation time drops to 3–5 seconds per nut. For a full 42U rack build (96+ cage nuts), that’s the difference between a 25-minute task and a 2-minute task.
4 Common Mistakes in Nut Caging
Mistake 1 — Wrong hole size. The single most common issue. Always verify the square hole dimension against the cage nut’s specified hole size. Standard M6 cage nuts for EIA-310 racks need a 9.5 × 9.5 mm hole; M5 cage nuts need 7.0 × 7.0 mm. A hole that’s 0.5 mm too large means zero retention — the nut will fall into the enclosure when the first screw is tightened.
Mistake 2 — Exceeding panel thickness. Every cage nut has a stated panel thickness range. If your panel is 2.5 mm and the cage nut is rated to 2.0 mm, the tabs won’t spring back far enough to grip. The nut feels “installed” but has essentially zero pull-out resistance. Measure panel thickness including any coating; powder coat adds 60–100 µm per side.
Mistake 3 — Over-torquing the screw. The cage nut thread is a standard nut thread, but the cage assembly is not structurally rigid. Over-torquing doesn’t just strip the thread — it can deform the cage body, causing the nut to spin freely or the cage to disengage from the panel. Follow torque specs: M6 cage nuts in 1.5 mm steel → 5–7 Nm maximum; 10-32 → 3–4 Nm maximum.
Mistake 4 — Installing cage nuts in the wrong sequence. In rack assemblies, cage nuts should be installed before the equipment is slid in. Installing cage nuts after the equipment is racked often means working with partial access — forcing improper tool angles that result in bent tabs or unretained nuts that fall to the rack floor.
Nut Caging vs. Alternative Retention Methods
Cage nuts win on removability and zero panel modification. Press-in PEM nuts win on pull-out strength and flush profile. Rivet nuts win in thick-wall or tube applications. Weld nuts win on absolute rigidity. Match the retention method to the structural requirement, not just the habit.
This is where most engineers either get it right the first time or revisit the decision during a warranty claim. Here’s the honest comparison:
Cage Nuts vs. PEM Press-In Nuts
PEM nuts (fasteners from PennEngineering, though “PEM” is often used generically for any clinch/press-in nut) are installed by pressing a flanged nut into a round hole — the nut’s knurled shank embeds into the panel material, and the flange swages against the panel face. The result is a permanently installed, flush-profile nut with pull-out forces typically 3–10× higher than a cage nut.
Use PEM nuts when:
- The threaded position is fixed and will never need to change
- Pull-out strength > 500 N is required (cage nuts typically max at 50–100 N)
- A flush, low-profile installation is needed (PEM nuts sit flush; cage nuts have a visible front flange)
Use cage nuts instead of PEM nuts when:
- The panel is already formed/painted (PEM installation requires pressing force that can distort finished panels)
- Hole positions may change between production runs
- The panel material is too thin for PEM installation (< 0.8 mm is marginal for most PEM nut designs)
Cage Nuts vs. Rivet Nuts
Rivet nuts (also called rivnuts or blind rivet nuts) are installed through a round hole with a rivet gun — the mandrel is pulled, collapsing the rear of the rivet nut body to grip the panel from behind. Installation requires access from one side only, similar to cage nuts, but the connection is permanent once set.
The advantage of rivet nuts over cage nuts: they work in round holes (no square hole required), they work in curved or tubular sections, and they handle higher pull-out forces (200–2,000 N depending on size). The disadvantage: permanent installation, more expensive tooling (rivet gun), and the rivet nut cannot be repositioned.
For server rack applications, cage nuts almost always win over rivet nuts simply because the square holes are already there per the EIA-310 standard. There’s no reason to drill round holes when the square ones are the standard pattern.
Cage Nuts vs. Weld Nuts
Weld nuts are exactly what they sound like: a nut with a flange or pilot that is projection-welded or MIG-welded to the panel during fabrication. Pull-out strength is extremely high (the weld joint fails before the thread), the nut is truly permanent, and the panel must be processed before painting or final assembly.
The core problem with weld nuts in relation to cage nut applications: they require both-side panel access during fabrication, specialized welding equipment, a skilled welder, and a process that must happen before the panel is painted or coated. For sheet metal shops doing high volumes, that’s manageable. For field retrofits or post-fabrication changes, weld nuts are simply not an option.
Cage nuts exist precisely because weld nut fabrication can’t solve field-installed or post-paint threading problems. They’re complementary technologies, not interchangeable ones.
| Criterion | Cage Nut | PEM Press-In | Rivet Nut | Weld Nut |
|---|---|---|---|---|
| Removable after install | ✅ Yes | ❌ No | ❌ No | ❌ No |
| Requires back-panel access | ❌ No | ❌ No | ❌ No | ✅ Yes |
| Works in square holes | ✅ Yes | ❌ No (round) | ❌ No (round) | ❌ No |
| Pull-out force (M6 typical) | 25–50 N | 2,000–5,000 N | 500–2,000 N | 5,000+ N |
| Panel thickness flexibility | ⚠️ Limited range | ⚠️ Min thickness | ✅ Wide range | ✅ Wide range |
| Post-fabrication install | ✅ Yes | ✅ Yes | ✅ Yes | ❌ No |
| Tooling cost | Low / none | Medium (press) | Medium (gun) | High (welder) |
| Unit cost (M6, qty 100) | $0.05–0.15 | $0.15–0.40 | $0.20–0.60 | $0.10–0.25 |
Future Trends in Nut Caging Technology (2026+)
Two forces are reshaping cage nut demand through 2026 and beyond: the EV battery enclosure boom is driving growth in lightweight, high-cycle cage nut designs, and factory automation is pushing tool-less snap cage nut formats that robot grippers can handle without torque sensors.
EV and Lightweight Enclosure Demand Driving New Alloys
The global EV battery pack market is projected to exceed $130 billion by 2030, according to industry analysis from the Industrial Fasteners Institute. Every battery pack requires an enclosure — and increasingly, that enclosure needs serviceable fastening. Recall programs, software updates requiring hardware access, and second-life battery reuse are all driving requirements for removable, reusable fastening at the battery cell and module level.
The material challenge: EV battery enclosures trend toward aluminum alloys (for weight reduction), and cage nuts designed for steel panels often don’t grip aluminum effectively — the spring force required to compress cage tabs during installation can scratch anodized surfaces, and the retention force in soft aluminum square holes can be insufficient. The industry response has been aluminum-body cage nuts with PTFE-coated tabs (to protect surface finishes) and floating designs that distribute retention load across a larger panel contact area.
We’re also seeing the emergence of composite and carbon-fiber-reinforced enclosures in premium EV applications. Cage nut retention in composite panels is fundamentally different — composite holes don’t deform elastically the way steel does, so traditional spring-tab retention becomes unreliable. Bonded cage nut assemblies (cage nut with a pre-applied adhesive carrier) are one solution being piloted.
Tool-Less Snap Cage Designs and Factory Automation
Traditional cage nut installation — even with a setter tool — is a manual, tactile process. As automotive and electronics manufacturing shifts toward higher levels of automated assembly, the “install cage nut by hand” step is an automation bottleneck. Robot end-effectors can manipulate cage nuts but providing precise snap-through feedback to confirm full seating is technically difficult.
Two design directions are addressing this:
- Audible/tactile snap confirmation — cage nut designs with a deliberately pronounced snap force and sound, specifically to help automated vision or force sensors confirm installation
- Magnetic-assist cage nuts — a small magnet embedded in the cage body helps robot gripper pickup and pre-positions the cage nut over the square hole before the push stroke
Neither of these represents a revolution in cage nut technology, but they reflect how seriously manufacturers are taking the automation compatibility question. For most bench and rack assembly applications through 2026, traditional cage nuts with setter tools remain the dominant approach.
FAQ
Q1: What is another name for a cage nut?
A cage nut goes by several names: captive nut, rack nut (in server rack contexts), clip nut (when a U-shaped clip form is used), and float nut (for self-aligning variants). In European catalogs, you may also see “Käfigmutter” (German), “écrou-cage” (French), or the generic “panel nut.” Functionally, all these terms describe the same concept: a threaded nut retained inside a spring-steel carrier that clips into a panel hole.
Q2: What screw size fits standard cage nuts?
Thread size depends on the cage nut you’ve specified. The two most common in rack applications are 10-32 UNF (standard in North American equipment) and M6 (standard in IEC/European equipment). Most modern racks and cage nuts are sold as 10-32 or M6 systems — don’t mix them, as the thread pitch is different and cross-threading is easy. For enclosure work, M4 and M5 are common. Verify thread size before ordering: cage nut packaging states the thread size on the label.
Q3: How much torque can a cage nut hold?
The cage nut’s thread strip torque is based on the nut’s thread class (typically 6H for metric, 2B for inch-series) and engagement length. An M6 cage nut will handle 8–10 Nm before thread strip. However, the cage retention in the panel is the binding constraint: if the cage pulls out of the panel before the thread strips, the effective torque limit is much lower. For M6 in 1.5 mm steel, keep installation torque to 5–7 Nm. For 10-32 in 1.2 mm panel, 3–4 Nm is the practical maximum.
Q4: Can cage nuts be removed and reused?
Yes — that’s one of the core advantages of nut caging over permanent alternatives. Cage nuts can be removed using a flat screwdriver (lever the front tabs out of the hole) or a dedicated cage nut removal tool. The reuse limit depends on panel thickness and cage tab condition. In our experience, cage nuts can typically be removed and reinstalled 3–5 times in the same hole before the tab spring force degrades enough to affect retention. For critical applications, replace cage nuts after 3 removal cycles.
Q5: What hole size does a cage nut need?
The square hole size must match the cage nut specification exactly. Common sizes:
- M3 cage nut → 4.5 × 4.5 mm hole
- M5 cage nut → 7.0 × 7.0 mm hole
- M6 / 10-32 cage nut → 9.5 × 9.5 mm hole (EIA-310 rack standard)
- M8 cage nut → 11.5 × 11.5 mm hole
A hole that’s even 0.5 mm too large causes zero retention. A hole that’s too small won’t accept the cage. Always confirm hole dimension on the manufacturer’s datasheet before punching your panel.
Q6: Cage nuts vs. clip nuts — are they the same?
Related but not identical. A cage nut encloses the nut on all four sides within a box-like cage. A clip nut (U-nut or U-clip) uses a U-shaped spring steel clip that slides over a panel edge or through a slot, with the nut captured in the U. Clip nuts are common in automotive body panels for edge-of-panel attachment; cage nuts dominate in rack and enclosure applications where square holes are the standard. The retention mechanism is similar (spring steel grip), but the hole shape and installation direction differ.
Q7: Where can I buy cage nuts — bulk vs. retail?
For small quantities (10–100 pcs), hardware retailers and industrial distributors stock standard M6 and 10-32 cage nuts; availability at general home improvement stores is limited to basic sizes. For production quantities (1,000+), order direct from specialist fastener suppliers — pricing drops dramatically at volume: standard M6 cage nuts typically cost $0.05–0.12 each in quantities of 1,000, vs. $0.20–0.50 each at retail. For unusual sizes (M3 stainless, M8 floating, etc.), specialist fastener distributors are the only reliable source.
Q8: What is a cage nut setter tool and do I need one?
A cage nut setter is a handheld tool (lever or pliers style) that presses cage nuts into square panel holes without requiring thumb pressure against the spring-steel tabs. For occasional installations (fewer than 20 cage nuts at a time), finger installation is adequate. For rack staging (96+ cage nuts per rack), a setter tool is essentially mandatory — it reduces installation time from ~15 seconds per nut to 3–5 seconds, eliminates the hand fatigue that causes misalignments late in the session, and produces more consistent tab retention. Good cage nut setter tools cost $15–40; they pay for themselves in the first rack build.
Conclusion
Nut caging is a deceptively simple technology — a spring-steel cage, a captured nut, a square hole — but specifying and installing it correctly requires understanding the interaction between cage type, panel thickness, hole size, thread standard, material finish, and installation torque. Get those variables right, and cage nuts deliver a fast, reliable, reusable fastening solution that holds up through years of maintenance cycles.
The decision between nut caging and alternative methods (PEM, rivet nut, weld nut) comes down to a single question: does this fastening point ever need to move? If yes, cage nuts are almost always the right answer. If the thread position is fixed forever and pull-out strength above 500 N is required, consider press-in or weld alternatives instead.
Ready to specify cage nuts for your next project? Browse our full range of cage nuts across metric and inch-series thread sizes, including floating variants, stainless options, and EIA-310 rack-standard sizes available in production quantities.
Related Products
Solutions & Cluster
Related Articles
- Barrel Nuts: The Complete Guide to Types, Sizes, Uses, and Installation
- Decorative Screws: Types, Finishes, Materials & Buying Guide
- Nyloc Nut: Types, Sizes, Standards & Buying Guide (2026)
- Screw vs Bolt: The Complete Guide to Choosing the Right Fastener
- What Are Screw Studs? Types, Uses & Selection Guide
- Vehicle Threads Explained: A Complete Guide to Automotive Fastener Thread Types, Standards, and Selection
- Exploring the Advantages of Laser Direct Structuring in Modern Design
- Nylon Screws: Complete Guide to Types, Sizes & Applications (2026)